|
You are not alone if the clutter in your home is too overwhelming for you to handle on your own. According to the National Association of Productivity & Organizing Professional (which your favorite professional organizer happens to be a member of *toots own horn*) 54 percent of America is overwhelmed by the amount of clutter they have, but 78 percent do not know to do with all of that stuff or find it too complicated to deal with it (2015). Hiring a professional organizer is an effective and efficient way to not only minimize your clutter, but also create a functional organization system in your home that can be maintained by you and your family. Professional organizers often go into "the biz" because they have a talent and eye for all things organization-- and yes, it's true, we really find satisfaction in organizing! Those beautiful "after" photos we create truly make our hearts soar and it's even better knowing we helped solve a problem for others. There are a few things all Professional Organizers want our clients to know before the organizing process begins. As an experienced Certified Professional Organizer® myself, I want to give you all a peek on the other side and help you prepare to work with a professional organizer, so I'm sharing with you 3 things Professional Organizers wish their clients knew. 1. If you're not willing to get rid of things, you're wasting your money. Before hiring a professional organizer, you need to be mentally prepared to donate and discard. Decluttering is an ESSENTIAL step in the organizing process. It may not be easy but you will have to relinquish a smidge of control and trust your professional organizer when they say "You really should part with *this.*" You are paying and hiring them for a reason! Your professional organizer will know how much needs to be given away/discarded and help you decide what you truly need. If you're not ready to reduce the number of items in your space, then your professional organizer will simply be rearranging rather than implementing an ideal organization system. 2. We are NOT judging the state of your home-- Honestly. Easily the most common hesitation people have about hiring a professional organizer is worrying they will judge your space. Professional organizers are the most organized people- right?! So they won't believe their eyes when they see such a chaotic home- right?! WRONG!! Professional organizers have seen it all, trust me, and even we have a disorderly spot in our homes. Nothing shocks us and we truly just want to help you. You may see a chaotic, cluttered, shameful closet-- we see an opportunity to use our skills, express our organizing creativity and make a client happy! 3. Doing the job right takes time Quality organizing work takes longer than you may think. The cluttered room did not happen in two hours, so it is not going to be fixed in two hours either. A good professional organizer will need ample time to get your space in tip-top shape. Pressuring an organizer to rush or requiring them to finish in an unreasonable amount of time will only result in either an unfinished job or half-assed work. Make sure to use the consultation (which most professional organizers require) to get a full understanding of the estimated time and cost necessary to achieve the results you're looking for. Budget and allow for the time to let us do our job and give you a high quality end result. I hope you enjoyed reading about the 3 things all professional organizers wish our clients knew! What questions do you have about the process of working with a professional organizer? Comment below! If you're looking for more organization ideas and tips, follow Sage Organizing Co. on Pinterest! Need more help with organizing your home or estate clearing? Contact us and book a consultation to start your organized life today! Professional Disclaimer: The ideas, recommendations, and opinions on this website, blog, and made in person are for educational and entertainment purposes only, and should not be considered legal, financial, or medical advice. I am not an attorney, doctor, or licensed financial professional. Sage Organizing Co., LLC is not liable for any losses or damages related to actions or failure to act related to the content of this website, blog, or in-person discussions. If you need specific legal, financial, or medical advice, consult a professional in your area.
0 Comments
Hiya fellow Quarantine Queens! I've been seeing a lot of posts swirling around the internet about banana bread, Tik Tok dances, and other activities to keep us busy at home. Many of my friends have texting me asking, "Alright Candi, I finally have some time to get my life together. I want to get an organizing project done but not sure what to tackle?" I don't know about you all, but being in quarantine has not only freed up some time for me, it has also made me think about organizing some of the essential "crisis" paperwork. Now, you may be wondering, "Candi, my favorite professional organizer, what in the world is 'crisis' paperwork!?" Well, I am so glad you asked! I'm about to fill you in. Crisis paperwork is paperwork that is important and and helpful during . . . you guessed it. . . a crisis- I'm here all night ladies and gentleman, well, and morning and afternoon, actually right now I'm here at home everyday all day. Okay okay, back to paperwork organization. Crisis paperwork, you may find, is what many consider death or doom + gloom paperwork. However, I have found: Using the phrase "Death Papers:" -Major bummer -Feelings of sadness -Denial settles in Using the phrase "Crisis Papers:" -Confident -Feelings of preparedness -Ready to take on the world As an estate clearing professional, I have seen the tremendous confusion and concerns that have arisen when a crisis occurs and necessary paperwork/important documents are either uncompleted and/or can't be located. During a crisis, emotions are already running high and stress is inevitable. Make it easier for you and/or your loved ones by identifying and completing your crisis paperwork NOW and organizing it in a designated space away from other miscellaneous paper. Here are the three categories of paperwork to organize your life for a crisis: 1. Healthcare Forms Healthcare forms that are essential to have finished and organized before a crisis include Healthcare Power of Attorney AND a Living Will. These two documents often go hand-in-hand and help protect your wishes as far as health and medical care while you are still alive. There are many situations and crises that would involve you being alive but unable to communicate what kind of medical treatment you want. Now, let me tell you why it's important to have BOTH of these documents. A Living Will lists out your desire or refusal of medical treatment if you are either permanently unconscious or terminally ill. This is an important document to organize before a crisis like the above to reduce emotional stress on loved ones as best as possible and to ensure you are being cared for the way YOU want. However, a Living Will is only used if the patient is deemed permanently unconscious. If you are temporarily incapacitated and are expected to recover, a Living Will does not take effect, therefore; the only person who could make medical decisions on your behalf (even if you're in a freakin' coma) would be a pre-designated Health Care Power of Attorney-- this is why it is ESSENTIAL to have both of these forms completed. I have conveniently included a link to your Health Care Power of Attorney and Living Will combined form ONLINE here. Take the time now in quarantine to go online and complete these essential documents to protect yourself and reduce the strain on family members. PRO TIP: Once you're done completing the forms, make sure your Health Care Power of Attorney has the original copy deeming his or her authority, you have a copy, and your healthcare providers also have a copy to put in your medical records. 2. Vital Life Documents This category of documents includes:
I HIGHLY recommend ordering an accordion file folder like this one on Amazon to keep all of your vital life documents together. Take advantage of the labels and use the bullets I listed above to create labels for each pocket. One step further, add a large label to the outside of the folder that says "Vital Life Docs." You don't need a fancy label maker, paper and tape work great! If you have a home office, store the accordion file there. If not, find another easy to access place. 3. Legacy Documents Legacy documents you should organize in case of a crisis are Last Will + Testament, records of all banking accounts, and list of all insurance policies. A Last Will and Testament is defined by LegalZoom.com as "A legal document that lets you, the testator (the person making the will), designate individuals or charities to receive your property and possessions when you pass away. . . A last will also allows you to name a guardian to care for minor children. The main purpose of a will is to ensure that the testator's wishes, and not the default laws of the state, will be followed upon the testator's death." This form is pretty self explanatory on why it is extremely important to have completed and organized before a crisis. You can easily create your Last Will and Testament online with Legal Zoom here. You'll also need to create a list of bank, investment, retirement/pension account numbers to ensure that all accounts are protected and resolved in case of a serious crisis. Lastly, compile all of your insurance policies-- most importantly your life insurance policy! Again, I highly recommend grabbing a second accordion file for this category of paperwork and following the instructions in step two for these documents. Phew, and that's all I got for you today folks! I GUARANTEE if you take the time to complete and organize the above documents, you will feel like you have your life together and more importantly you will be PREPARED in case of a crisis. Quarantine time really puts things into perspective and reminds us how fragile and valuable life is. Take care of yourself and make things easier on trusted family and friends by organizing the above "Crisis Paperwork." Have questions on any of the listed forms or documents? Comment below! If you're looking for more organization ideas and tips, follow Sage Organizing Co. onPinterest! Need more help with organizing your home or estate clearing? Contact us and book a consultation to start your organized life today! Professional Disclaimer: The ideas, recommendations, and opinions on this website, blog, and made in person are for educational and entertainment purposes only, and should not be considered legal, financial, or medical advice. I am not an attorney, doctor, or licensed financial professional. Sage Organizing Co., LLC is not liable for any losses or damages related to actions or failure to act related to the content of this website, blog, or in-person discussions. If you need specific legal, financial, or medical advice, consult a professional in your area.
Punxutawney Phil, easily the most famous groundhog alive, correctly predicted an early spring this year which I could not be more excited about! As a professional organizer, springtime means spring cleaning. I get it though, cleaning the house isn't always a fun task even if it is during the springtime. If anything, many of us would rather be out enjoying the nice warm weather instead of scrubbing our floors. Much like New Year's resolutions, spring cleaning often starts with good intentions but can easily be thrown to the side if you are not prepared and organized to get the job DONE! Here are some easy tips from your favorite Certified Professional Organizer® to organize your spring cleaning and make it a success. 1. Gather your supplies Before you start any of your cleaning, make a list of items you will need. This list may include soft cloths, glass cleaner, multi-purpose cleaner, bathroom cleaner, trash bags, a duster, maybe Swiffer pads. . . and any other products you use to clean your home. Organize your list by room and write the products you need to clean each room or space even if there are duplicates. A few items I HIGHLY recommend you add to your list is a few boxes or thick trash bags for donations. Additionally, add a a box or two for moving items. When you start cleaning, you may come across a few items that are out of place. Instead of taking the time to put that item in it's place and stopping your spring cleaning flow, put it in the "moving" box and take care of the items once you're finished cleaning for the day. 2. Declutter before cleaning Make sure to declutter your space before you clean it. It is so much easier to dust and wipe down surfaces with less stuff. There are two approaches to this method:
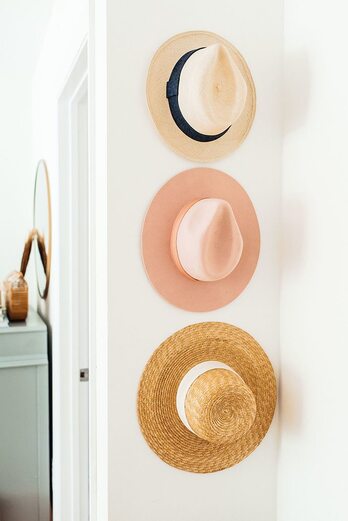
3. Get creative Don't feel tied to the way you had items placed before the decluttering and cleaning process. Be creative with how you decide to reorganize your things and use the space you have. Consider hanging hats on a wall like the image below for instance or using an over the door organizer for your shoes. Being creative can get us excited about organizing and cleaning. It feels good to have a new look in a room which will provide you the energy you need to work on the next room. 4. Clean by Blog Post Take advantage of the resources we offer here on the Sage Organizing Co. advice blog! Consider planning your cleaning by a blog post a day. For instance, Monday you declutter your kitchen then follow these 4 Kitchen Organizing Secrets that will Blow your Mind to guide your cleaning. Tuesday, declutter your closet then follow Sage Organizing's 5 Tips to Organize your Closet. I've included links to other blog posts that may be helpful for your spring cleaning:
Which spaces or rooms do you plan to spring clean? Comment below! If you're looking for more organization ideas and tips, follow Sage Organizing Co. onPinterest! Need more help with organizing your home? Contact us and book a consultation to start your organized life today! Professional Disclaimer: The ideas, recommendations, and opinions on this website, blog, and made in person are for educational and entertainment purposes only, and should not be considered legal, financial, or medical advice. I am not an attorney, doctor, or licensed financial professional. Sage Organizing Co., LLC is not liable for any losses or damages related to actions or failure to act related to the content of this website, blog, or in-person discussions. If you need specific legal, financial, or medical advice, consult a professional in your area.
I know it may be something you're hesitant to talk about with a professional organizer, but we gotta handle that junk drawer! Now, don't feel ashamed, we ALL have some degree of a junk drawer in our homes (even professional organizers!) However, we can't let it get out hand. A junk drawer can morph into a junk side table, then into a junk console, and before you know, it's turns into a junk virus, spreading throughout your home. Your favorite professional organizer is here to help you get that dreaded junk drawer organized! The goal is not to eliminate the existence of a junk drawer in your home but instead make it a functional junk drawer. If you're tired of slipping things in your junk drawer and being scared to look in, follow the steps below. Step 1: First, DECLUTTER Take everything, and I mean EVERYTHING, out of your junk drawer (or junk drawers.) Dump it all out on the floor or a large table. Now, go through each item and decide if you need it or not (or as Marie Kondo would say, "Does it spark joy?") Do you really need 12 pens that barely write? What about those Chick-fil-a receipts from last year? If you're having doubts, you probably don't need it. Step 2: Clean that drawer! This is a great time to wipe down and clean the inside of the drawer before you put anything back in. Make sure to get in all the corners and take note of how much space you have in there for your stuff (reconsider decluttering more if you're thinking the drawer is smaller than you thought!) Step 3: Sort your stuff Look at the remaining contents and group similar items together. Try to make your "throwaway/recycle" pile the biggest one and don't hesitate to make a "relocation" pile to put items in different places in your home they are better suited for. It is hard to tell you exactly what these groups should be because everybody's junk drawer is going to be unique! Here is an example of a categorized kitchen junk drawer to get you thinking:
Step 4: Choose a storage solution Based on the number and types of categories you have for your junk drawer, choose a storage solution that has compartments to keep your things organized in your junk drawer. Make sure to measure your drawer! If there are gaps between the storage compartment(s) and the drawer, stuff is bound to get stuck where it shouldn't be. There are a bunch of different options at HomeGoods and Target for your junk drawer. Here are some Amazon links to check out
That's your quick guide to organizing your junk drawer, according to a professional organizer. Now that your drawer is organized, it's time to keep it that way! Check out this post I wrote on maintaining organization to get some ideas. If you're looking for more organization ideas and tips, follow Sage Organizing Co. on Pinterest and get ideas from a Professional Organizer!
Need more help with organizing your home? Contact us and book a consultation to start your organized life today! Professional Disclaimer: The ideas, recommendations, and opinions on this website, blog, and made in person are for educational and entertainment purposes only, and should not be considered legal, financial, or medical advice. I am not an attorney, doctor, or licensed financial professional. Sage Organizing Co., LLC is not liable for any losses or damages related to actions or failure to act related to the content of this website, blog, or in-person discussions. If you need specific legal, financial, or medical advice, consult a professional in your area. The holidays are over and the twenties are officially upon us. Woo hoo!! The phrase "out with the old, in with the new" is true for many people when it comes to starting off the new year fresh-- organization is no exception! New Year's resolutions are often well-intentioned, but let's be honest-- they are usually thrown to the way-side a month or even a few weeks into the year. Life is busy, work and kids are a lot to manage, how are we supposed to find time to do yoga and eat vegetables 3 times a day?! Whether it's quitting bad habits, starting a new hobby, or adjusting your lifestyle, you can set yourself up for success this new year by implementing organization in your home and schedule! Read on to find out 5 tips to organize your 2020! 1. Utilize a calendar Whether it be paper or digital, having (and using!) a single calendar for all tasks, reminders, appointments, and events is the first step to organizing your day, week, month, and year. Most phones come with a calendar app already installed, but if you aren't a fan of how it functions, there are plenty of other calendar apps you can download. A great benefit of digital calendars is you can also set up reminder notifications to prevent from any confusion. If digital calendars aren't your thing, a paper calendar works too! One thing to keep in mind is to make sure your calendar is portable so you can add events to it even when you're not home. At some point, we all have had to delay scheduling or adding an event to our calendar because it's at home on our wall or desk. A portable calendar makes it easy for you to keep track of your life at home and on-the-go! 2. Post-Holiday Present Declutter Presents are abundant during the holidays which is all great fun until our home gets cluttered. Think about all the presents you received and count them. Now, take that number and give away or throw away the same number of items in your home. Read here to decide if an item should be donated or thrown out! A post-holiday present declutter is a great way to maintain organization in your home and make sure you don't have too much stuff for the space available. 3. Cleaning/Chore Schedule Establishing a cleaning/chore schedule for your household is a must! None of us are excited about cleaning our bathrooms so it's easy to put it off. However, this often ends up in frustration and feeling overwhelmed. A schedule keeps everybody on track and spreads the responsibility evenly amongst all family members. Nobody can use the excuse anymore that they didn't know or forgot they had to do a house chore! Plus, by spreading the cleaning and chores across all family members, you have more time and can realistically plan accomplishing those new year's resolutions! 4. Family Message Board A family message board and a chore schedule sound like they may be same, but these are separate and have their own functions. The chore schedule should show family members their responsibilities for the week or month. A message board is perfect in the kitchen or anywhere everybody in the house passes through to communicate. Messages may be something like, "I fed the dog" or "I'll be back around 6pm" or "dinner is at 7pm." Message boards are an easy and fun way to make sure the whole family is on the same page and knows what's going on. 5. Meal Prep Prepping your meals for the week is another way to manage time plus eat healthy. Meal prepping prevents those times of coming home from work, starving, and not in the mood to make a balanced meal so you just reach for the instant mac and cheese for you and the family. Moments like these are what often lead to giving up on resolutions. Meal prepping gives you a sense of accomplishment and enables you to be more productive during busy weekdays. You can read more details on meal prepping (and how I manage to do it for my family) here. And those are 5 tips from a Certified Professional Organizer® to start your 2020 off organized! Set yourself up for success in the new year by getting your home, schedule, and life organized. What are your New Year's resolutions? Comment below! If you're looking for more organization ideas and tips, follow Sage Organizing Co. on Pinterest and get ideas from a Professional Organizer! Need more help with organizing your home? Contact us and book a consultation to start your organized life today! Professional Disclaimer: The ideas, recommendations, and opinions on this website, blog, and made in person are for educational and entertainment purposes only, and should not be considered legal, financial, or medical advice. I am not an attorney, doctor, or licensed financial professional. Sage Organizing Co., LLC is not liable for any losses or damages related to actions or failure to act related to the content of this website, blog, or in-person discussions. If you need specific legal, financial, or medical advice, consult a professional in your area.
Whether you're full of excitement or dread, the holiday season is officially upon us. The holidays can be chaotic no matter your own personal feelings on the season. During this busy time of year, it is easy for your home to suffer from clutter and disorganization. I think it's safe to say we all have the thought of "What am I supposed to do with (this/that/the other)?" more often than usual during the holidays. One holiday tradition that trips up a lot of people is organizing, displaying, and storing greeting cards. We all love seeing adorable pictures of family and friends! However, it is important to establish a functional way to organize these cards so that they don't start taking over all flat surfaces. Your favorite professional organizer is here to help! Here are six ways to manage your greeting cards this holiday season: 1. An easy way to display, organize, and store greeting cards is to hole punch the top corner of each card. Next, grab a binder ring clip and thread all of your cards on the ring. This is a great method to keep your cards from being scattered all over the house and to easily flip through all of them. BONUS: if you're really feeling ambitious, you can create a "cover" card to label the year. A cover card, for example, may say something like "Christmas 2019" or "2019 Holiday Cards." Feel free to make it as pretty and festive as you like!! 2. Another way to organize greeting cards is to store them digitally. Of course, you can scan each card into your computer or laptop but for those of who are a little more technologically challenged, it is simpler to take a photo with your phone. Make sure to create a "2019 Holidays" folder for the photos to be kept in so that you aren't cluttering your phone gallery while decluttering your home! 3. Shop for a festive card holder! You can find just about anything on Amazon, am I right? A great way to show off those beautiful pictures of your kids and grandkids is to use a card holder that doubles as holiday decor. I found this absolutely gorgeous card holder that looks like a chapel here on Amazon: Chapel Card Holder There are tons of different styles if you prefer something else like this Wire Christmas Tree Card Holder 4. Another more "trendy" option for displaying photos and cards is on strings of light using clothespins. Here's a link to a string of lights that has the lights IN the clothespins, we are truly living in the future folks: Photo Clip String Lights A lot of people keep these lights up all year round and switch out the photos as often as they like. This is an easier way to display more recent memories without having to find places for more photo frames. 5. Card storage boxes or accordion file folders are great options for storing those cards of your sweet little ones. Here's a storage box on from Bed Bath and Beyond: Card Storage Box with Dividers Whether you use a storage bin or an accordion file, make sure to take advantage of the labels! You can either label by year or even by child. This is a great way to see how your kids have grown through the years. 6. One last tip is the importance of differentiating cards that turn into keepsakes or clutter. Consider why you are keeping holiday cards? If it's out of pure guilt, know that it is okay to recycle the majority of your cards. The KonMari method is a great tool for this situation. Keep the cards that truly spark joy! What is your favorite way to display or store cards? Comment below! If you're looking for more organization ideas and tips, follow Sage Organizing Co. on Pinterest and get ideas from a Professional Organizer! Need more help with organizing your home? Contact us and book a consultation to start your organized life today! Professional Disclaimer: The ideas, recommendations, and opinions on this website, blog, and made in person are for educational and entertainment purposes only, and should not be considered legal, financial, or medical advice. I am not an attorney, doctor, or licensed financial professional. Sage Organizing Co., LLC is not liable for any losses or damages related to actions or failure to act related to the content of this website, blog, or in-person discussions. If you need specific legal, financial, or medical advice, consult a professional in your area.
Pantries are like the command center of the kitchen. Our kids and spouses shuffle through them looking for a snack, the chef of the house drags out all the spices for dinner-- our pantries are bound to become a chaotic mess without some organization. Read on for my top 4 easy hacks for organizing your pantry today! 1. Get rid of those boxes Empty out food that comes in cardboard boxes or oversized bags and use clear containers to store your food. This not only helps you fit more into your pantry, but it's also a better system to keep your food fresh longer since the containers will be far more airtight than a box. You can buy clear plastic containers from Amazon, Target, Walmart, or HomeGoods. Mason jars are also a great alternative! 2. Get those cans in order Before organizing your canned goods, it's best to go through them all and make sure there aren't any that are expired. Next, invest in a can rack to keep your canned food from getting knocked over or edging out of its given space in your pantry. You can buy a can rack from Amazon right here! 3. Separate your food by meals/needs Make sure that your food is organized by category. For instance, I like to keep all of my baking ingredients together so I'll keep my vanilla extract (for example) with all my other common baking goods instead of with all the spices I use for cooking meals. I also like to keep all of my "breakfast" food in one area together and "snacks" in a separate part of the pantry too. This makes it easy when you're cooking to just have to look in one spot of the pantry instead of going through the entire space. 4. Add wire shelves Maximize the space in your pantry before sacrificing some of your organizing goals. I personally love to use under shelf baskets like these from Amazon to utilize vertical space. If under shelf baskets don't seem right for your pantry, consider getting shelves for your pantry door like this one. The more space you have, the easier it will be to categorize and organize your pantry so it's not all jumbled. And those are my top 4 easy hacks for organizing your pantry and making your food accessible. It may take a little effort to get it in order at first, but following these pantry organization tips will save you far more time and stress in the long run. If you're looking for more organization ideas and tips, follow Sage Organizing Co. on Pinterest!
Need more help with organizing your home? Contact us and book a consultation to start your organized life today! Professional Disclaimer: The ideas, recommendations, and opinions on this website, blog, and made in person are for educational and entertainment purposes only, and should not be considered legal, financial, or medical advice. I am not an attorney, doctor, or licensed financial professional. Sage Organizing Co., LLC is not liable for any losses or damages related to actions or failure to act related to the content of this website, blog, or in-person discussions. If you need specific legal, financial, or medical advice, consult a professional in your area. Closets: the space that can either fill our hearts with ease or dread. As a professional organizer, I often work with my home-organizing clients on the closets in their homes. It is so easy for these tiny little rooms of ours to become overwhelming, cluttered, and messy because of all that we try to fit in them. Plus, closets are easy to hide from visitors. We just shut the door and blissfully ignore the truth that lies inside. Never fear, Candi is here! I have listed below my top five tips to make your closet an organized dream. I am positive that if you follow and commit to the following advice, you are sure to have a functional, organized closet. 1. Use slim hangers We've all seen the slim, velvety hangers but I promise you, they are NOT a gimmick! They will reduce how much space your hangers are taking up now by 30%. WOW! Now, I know what you're thinking, "But wire hangers are thin too." And yes, wire hangers are thin but they do not hold onto clothes well. Once clothes start slipping off of hangers, your closet is bound for chaos. The slim velvet hangers keep your clothes from going anywhere and the best part about them is they are CHEAP! You can find them at Target, Walmart, Amazon, HomeGoods, TJ Maxx, and plenty of other places. I included a shopping link below for your convenience. https://www.amazon.com/dp/B07PGT9Y1J/ref=cm_sw_em_r_mt_dp_U_YLkPDbBK1YQVY 2. Organize shorter garments closest to the door and longer garments furthest away To give your closet a far more organized aesthetic, place your shortest garments closer to your closet door entrance and gradually work your way back with longer clothing. Not only does this look better, but it is easier for you to find the shorter clothing items when they aren't hiding in between your longer garments. This tip will help you find the garment you're looking for, clearly see all the clothing you have hanging, and create a more pleasing and organized closet. 3. Ratios- The One for One Rule Having trouble with a cluttered closet? Still feel like your closet is STUFFED even after switching to slim hangers? You need the One-for-One rule in your life. Every time you buy a new dress, shirt, skirt, pair of pants, whatever is may be, you donate another piece of clothing from your closet. This rule prevents you from cluttering up your closet and helps you let go of the clothes you aren't using. What I love about this rule is once I give away one piece of clothing, I start to notice other garments I should donate too which is a great habit to get into. If you are really committed to sizing down your closet, make it a One-for-Two rule and get rid of two garments for every new one you bring home. 4. Keep the floor as clean as possible This may seem like an obvious organizing tip, but it's essential to keep this one in mind! If possible, try to keep your clothes from draping on the floor. When your floor isn't visible, it is bound to become messy in those hidden areas. Some people are able to keep their shoes lined up and neatly organized on the floor, but this is difficult for most people. I highly recommend using shoe racks to keep your shoes off the floor and organized. 5. Utilize storage boxes to store seldom used or off-season garments I absolutely LOVE this closet organization tip. I have had many clients tell me that their closet is too small or they can't fit all of their things in their closets even after decluttering. Storing seldom used or off-season garments is the key to getting your closet in tip-top shape. You can either grab plastic bins from the dollar store and add labels or go for some pretty fabric boxes to store your clothes. There are also plenty of under bed storage boxes that work great as well. But don't forget: if you store your bulky sweaters, make sure to throw replace them with your summer clothes when you pull those sweaters out. And for a seldom used bin of clothes: be sure to put them back in their designated bin once you're done wearing them so that they don't sneak into your closet space! Those are the 5 tips to get your closet in order! It isn't as hard as it sounds, I promise. Closets can be daunting, but I hope these five snippets of advice will help get you and your closet on track to an organized haven. If you're looking for more organization ideas and tips, follow Sage Organizing Co. on Pinterest!
Need more help with organizing your home? Contact us and book a consultation to start your organized life today! Professional Disclaimer: The ideas, recommendations, and opinions on this website, blog, and made in person are for educational and entertainment purposes only, and should not be considered legal, financial, or medical advice. I am not an attorney, doctor, or licensed financial professional. Sage Organizing Co., LLC is not liable for any losses or damages related to actions or failure to act related to the content of this website, blog, or in-person discussions. If you need specific legal, financial, or medical advice, consult a professional in your area. Before you can get properly organized, it is important to declutter your home! Now wait, I can already hear you saying, "That's great Candi, but where do I START?!" I totally understand what you mean. It can be hard to decide what to give away and what to keep especially when we feel attached many items in our home. How many times have you thought, "Well, maybe I'll need this sometime in the distant future?" or "What if I regret/feel guilty about getting rid of this?" I know the feeling and that is why I am here to help! I have compiled a short list of 15 items you should NOT feel bad about getting rid of. Whether you are planning on moving, recently moved, or just plain tired of the disorganization, this list will guide you in starting to declutter your home. Some items on the list can definitely be thrown away, but I highly recommend you consider the condition of the item first and if it should be donated so that somebody else can benefit from it. Your GUILT-FREE Decluttering List 1. Old nail polishes and expired skincare/makeup 2. Clothing you haven't worn in years or clothing you bought years ago but never wore 3. Games and puzzles with missing pieces 4. Old children's toys and dog toys (this is important not only for decluttering but for sanitary purposes too!) 5. Books, including recipe books, that you don't plan on reading again or reading at all (be honest with yourself here) 6. Mostly empty cleaning supplies/bottles and condiment bottles 7. Broken jewelry or jewelry you never wear including watches 8. Old receipts, coupons, flyers, notes, and paper (If there is info you REALLY need, transfer it to a document on your computer/phone!) 9. Children's art work, completed school work, and old baby clothes... narrow down to just a few of these if you want memories or take photos on your phone. I know it can be hard, but you definitely don't need all of it! 10. Pens, markers, and any other craft supplies that are old or excessive 11. Old/frayed underwear, socks, and undergarments 12. Plastic bags from grocery and shopping stores 13. DVD's, CD's, and VCR tapes as well as old electronic players 14. Old, damaged cooking utensils such as spatulas and cooking spoons 15. Old or worn rugs, towels, and blankets (I especially like to switch out my old hand towels with new ones so I always have bright white and fresh towels in the bathroom!) Phew, and that's it folks! Of course, this isn't a comprehensive list for everything you need to get rid of, but it's a good place to start. And, let me remind you one last time, you do NOT need to feel guilty about throwing away or donating any of the items I listed! If you're looking for more organization ideas and tips, follow Sage Organizing Co. onPinterest! Need more help with organizing your home? Contact us and book a consultation to start your organized life today!
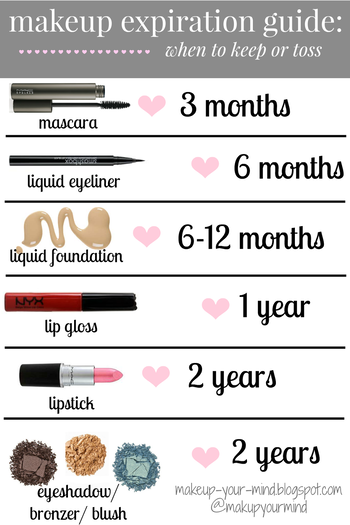
Professional Disclaimer: The ideas, recommendations, and opinions on this website, blog, and made in person are for educational and entertainment purposes only, and should not be considered legal, financial, or medical advice. I am not an attorney, doctor, or licensed financial professional. Sage Organizing Co., LLC is not liable for any losses or damages related to actions or failure to act related to the content of this website, blog, or in-person discussions. If you need specific legal, financial, or medical advice, consult a professional in your area. Makeup: a love-hate relationship. It can be fun to experiment with new makeup products and try out the trendiest lipstick shades, but after the shopping-adrenaline wears off, the sheer number of cosmetic products we each own can be truly overwhelming. Concealers, foundations, eyeshadows, eyeliners, mascaras, blushes, bronzers- the majority of our makeup comes in small, individual containers. With all these small products, it can be hard to have a functional cosmetic organization system. Stop feeling like your makeup storage is grimy and embarrassing and follow these 5 hacks for a clean, organized space to hold your makeup goodies: 1. Throw away all expired makeup/makeup you don't useA lot of people don't realize that makeup products expire. Each item of makeup should have a small picture of container on it with how many months the makeup is good for. For instance, the back of my bronzer says "24M" inside the picture of the container meaning it expires in 24 months. Keeping old makeup not only clogs up your pores, it clogs up your storage too! While you are checking the expiration dates on your products, also think, "When was the last time I used this?" Just because it isn't expired, doesn't mean it deserves a place in your drawer. It can be hard to part with makeup but once you throw away makeup you aren't using, it will make you more conscious the next time you go shopping. Check out this chart to help if you still have questions about when your makeup expires!
|
Read on for 5 fantastic experience gift ideas...
1 ). Tickets and/or Memberships
- Kids: Children's theater tickets, zoo membership, aquarium membership, science museum tickets.
- Teens: YMCA or local gym membership, movie passes for local theater, ice skating passes or membership to a rink, batting cages and go karts tickets, concert tickets.
- Adults: Pro or minor league sports tickets, local theater company subscription, museum membership, broadway show ticket package.
2 ). Classes
- Kids: Ballet, dance or gymnastics classes, art lessons, horseback riding lessons, cooking classes, swimming lessons.
- Teens: Surfing lessons, snowboarding class, private lessons for a sport or hobby.
- Adults: Paint and Sip classes, crafting workshops, cooking classes or in-home chef, MasterClass, yoga classes, dance lessons, wine tastings class, flower arranging lessons.
- Hint: Groupon and Living Social are great places to find discounted classes and trips.
3 ). Trips
- Kids: Great Wolf Lodge, amusement park trip, ski trip, beach trip, Washington DC.
- Teens: bring one friend on a weekend away at beach, mountains, city.
- Adults: Fun local day trip and tour ( like Biltmore House, Charleston, or Savannah in the Southeast), unusual tour in vacation destination (dolphin tour, ghost tour, foodie walking tour, etc.), wine country, big festival like Jazz Fest, Taste of Chicago, Macy’s Thanksgiving Day Parade,etc.
4). Big Tickets items
- Kids: pay for summer camp, buy a musical instrument and lessons, pay for a session of classes or a sport (e.g. soccer or football season).
- Teens: Trip overseas, pay for a year of school fees, books for college, or even a year of college.
- Adults: Monthly cleaning service, weekly meal delivery service , pay for a family photo shoot and the prints, purchase a season of opera tickets, monthly flower delivery.
5). Other cool Experience gifts
*Helicopter tour (or airboat, tractor, train etc)
*A year of date nights (12 gift cards to restaurants, movies, sporting events, museums, etc)
*Skydiving
*Sailing or boating tour
*Massage and or facial
*Subscription boxes
Professional Disclaimer: The ideas, recommendations, and opinions on this website, blog, and made in person are for educational and entertainment purposes only, and should not be considered legal, financial, or medical advice. I am not an attorney, doctor, or licensed financial professional. Sage Organizing Co., LLC is not liable for any losses or damages related to actions or failure to act related to the content of this website, blog, or in-person discussions. If you need specific legal, financial, or medical advice, consult a professional in your area.
Enough with the stuff! Give the Gift of Experience instead.
In this article, we'll be sharing ideas for organizing and staging the living room, master bedroom, and kitchen, so you you can sell you house faster. AreaReal Estate professional Leigh Bryant, of The Temple Team at Keller Williams, will also share some of the tricks of the trade with our readers.
Here are 9 home staging ideas to sell your house quickly...
Living Room
- Paint your walls a neutral color: now is NOT the time to show your personality through color. Potential buyers want to be able to envision themselves living in the home; it's tough if they are distracted by blazing lime green walls. Freshen the space up with a new coat of a soothing, neutral color.
- DECLUTTER: this is the number one piece of advice Realtors give to their sellers. Warning: Do NOT "hide" the excess clutter in closets....buyers look in closets, too. Remove excess clutter, box it up and put into storage.
- Help buyers imagine living there. Create "cozy" vignettes, like a quiet reading nook in the corner.
Master bEDROOM
- Remove all personal items. Yes: even your wedding photos, photos of your children, and any religious icons. Same goes for any clothing, personal care items (like perfume bottles), and artwork. There should be no evidence of the people that live in the home.
- Stage the closets, too. Buyers are always thinking about storage space; show case the available space in the closets. Real Estate professional Leigh Bryant suggests that clients "channel Martha Stewart" whenorganizing their closets before photographs and showings. A good suggestion is to have the closets 50% empty.
- Make the room calming and spa-like. The room should be well-lit, be spotlessly clean, and smells pleasing. Creating vignettes, like a reading area or a window seat, helps the buyers envision how they would use the space.
KITCHEN
- Pay special attention to decluttering and organizing the cabinets and drawers. Home buyers can and will look inside your cabinets to assess the storage space. Cabinets and drawers should be 50% empty, clean and look like a Crate and Barrel display. Box up and put your excess kitchen items in storage.
- Only leave 2 appliances on the counter-top, at the most. A coffee-maker is acceptable, but make every effort to not have anything else on the counter. Your counters should be clean, empty, and showcase the space.
- Create a pretty scene at the sink. Your sink should be spotlessly clean and smell like heaven (run lemons through the disposal if odor is an issue). Have a pretty dishtowel, some fancy dish soap and a new washcloth/sponge laid out.
Ready, set, Stage!
|
Leigh Bryant is the Director of Sales and Expansion Partner for The Temple Team in Charlotte, NC. Contact her here.
|
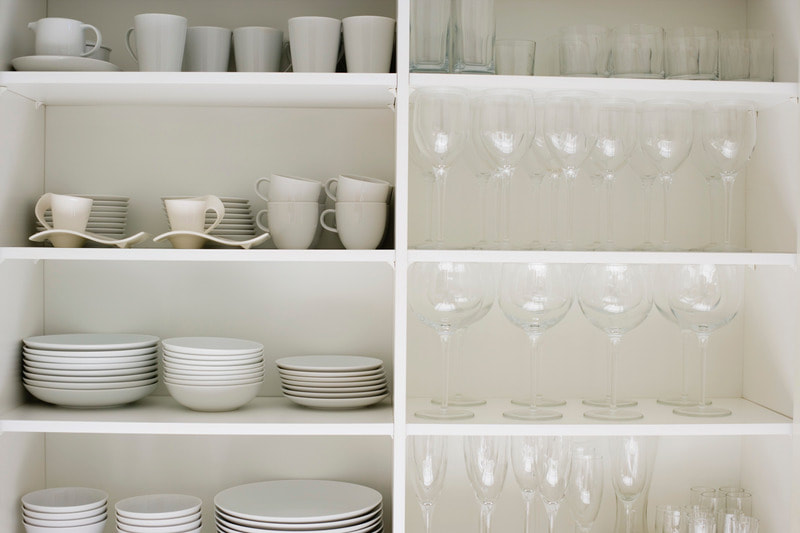
Ready to learn the Kitchen Organizing Tips that will amaze you? Read on...
Secret #1: Organize Your Kitchen Into Work Zones
Ideas for kitchen work zones:
Dishwasher and Sink
What: Cleaning products, dish towels, everyday plates, bowls, silverware and glasses.
Why: Keep items closest to where they are most frequently used. Choose cabinets, shelves, and drawers near the dishwasher to make unloading efficient and easy.
Cooking and Stove
What: Pots, pans, bake ware, and cooking utensils, and frequently used spices/oils.
Why: Reduce the movement needed when cooking hot foods. Choose deep cabinets for pots and pans. Store bake ware near oven.
Food Prep Zone
What: Cutting boards, mixing bowls, Tupperware, knife block, often-used counter top appliances.
Why: Keep everything you need to prep your meals within arms reach. Keep appliances that are used daily on the counter top; everything else should be stored in cupboards and drawers
Food Storage Zone
What: Shelf stable foods and food wraps. Usually stored on pantry shelves.
Why: Keeping all food in the same area allows you to see when you’re out or running low. Organize foods by category (e.g. all baking items together, all canned goods, snacks, etc.)
The Rest
What: Everything else should be filled in in the remaining available spaces.
Why: All the often-used items have been put away. Now put the rest away in the high, low and tough-to-get to spots.
Secret #2: The Countertop is Prime Real Estate
For example, if you’re a daily coffee drinker, your coffeemaker should be on the counter top. (Pro tip: store your coffee mugs, coffee, and filters in the cabinet directly above the coffee maker for easy access). Same thing goes for a toaster: if you enjoy toast daily, leave the toaster on the counter top and store the butter dish in the cabinet above it.
The counters around the kitchen sink deserve some counter space, since many items are used all day long. Dish soap, hand soap, and paper towels all belong right next to the sink. Keeping neatly folded dish towels in a small basket near the sink is another option.
Be honest with how often you really use small appliances. Just because you make a panini once a month does not warrant a space on the counter for the Breville. If you make smoothies only on the weekend, do not leave the blender on the counter all week. Store your lesser-used appliances in cabinets and pantry shelves.
How to Sort Like a Pro: Advice from a Professional Organizer
Declutter, Donate, and Deduct
Hoarder, Pack-rat, or Just Messy: 3 Ways to Tell the Difference
How to Beautifully Stage Your Home So it Sells in a Flash
Secret #3: Allow Yourself a “Junk Drawer”, but organize it!
Frequently used “junk drawer” items ideas:
- Stamps
- Pens, pencils, rubber bands, paper clips and twist ties
- Batteries
- Notepads and post-its
- Gum, mints, and ChapStik
- Scissors and tape
- Chargers and earbuds
- Loose change
- Birthday candles and matches
- Small hand tools, nails and screws
- Flashlights
And One More Secret: Enough with all the Duplicate Items!
What about items that are used once a year (e.g. only pulled out at Thanksgiving)? Ask yourself if you really use the item...or just used it once and not-so-much anymore. Be ruthless!
Have more than one actively-used set of these items? Consider boxing it up and donating to a good local charity.
- Kitchen utensils (e.g. spatulas, old paring knives, corkscrews)
- Glassware and coffee mugs.
- Tupperware and disposable plastic ware
- Pots and pans
- Old appliances that have have been replaced (e.g. your old 1980’s crock pot with the flowers on it).
6 Things to Not Bother Collecting Anymore (and How to Tell What IS Worth Holding Onto)
How to Sort Like a Pro: Advice from a Professional Organizer
You can Organize your kitchen!!
What's your favorite kitchen organization tip?
Professional Disclaimer: The ideas, recommendations, and opinions on this website, blog, and made in person are for educational and entertainment purposes only, and should not be considered legal, financial, or medical advice. I am not an attorney, doctor, or licensed financial professional. Sage Organizing Co., LLC is not liable for any losses or damages related to actions or failure to act related to the content of this website, blog, or in-person discussions. If you need specific legal, financial, or medical advice, consult a professional in your area.
Categories
All
Back To Schoool
Before & After
Closet Organization Ideas + Hacks
Decluttering Your Home
Downsizing Your Home
Estate Clearing
Family Heirlooms
Family Schedule Logistics
Free Download
Garage DIY Organization
Garage Mudroom
Grocery Planning
Holiday Organizing
Home Organizing
Later Life Planning
Meal Planning
Mental Health
Moving
Organizing Aging Parents
Organizing Products
Selling Offline
Selling Your Stuff
Sentimental Items
Weekly Family Routine
Looking for something?
Archives
November 2023
October 2023
September 2023
April 2021
March 2021
February 2021
January 2021
December 2020
November 2020
October 2020
September 2020
August 2020
July 2020
June 2020
May 2020
April 2020
March 2020
February 2020
January 2020
December 2019
November 2019
October 2019
September 2019
May 2019
April 2019
March 2019
November 2018
October 2018
September 2018
July 2018
June 2018
May 2018
April 2018
March 2018
February 2018
January 2018
December 2017
November 2017
October 2017
September 2017
August 2017
June 2017
May 2017
April 2017
March 2017

